How to Install Ubuntu on Windows using WSL (Windows Subsystem for Linux)

WSL (Windows Subsystem for Linux) enables you to run a Linux distribution alongside Windows. In this blog article, we will walk you through the process of installing Ubuntu on Windows using WSL, giving you a strong Linux environment on your Windows system.
Prerequisites:
Before you begin, make sure you have the following:
- Windows 10 or Windows 11 is required.
- Access to your Windows system as an administrator.
- A stable internet connection.
Step 1: Enable WSL Feature
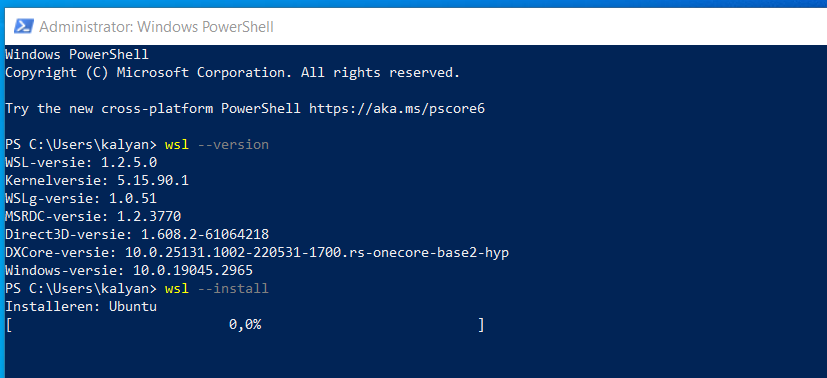
The first step is to enable the functionality Windows Subsystem for Linux. Run the following command as an administrator in PowerShell:
wsl --install

Install the latest WSL version using Administrator Windows Powershell
This command will enable the necessary components and install the latest WSL version on your Windows machine.
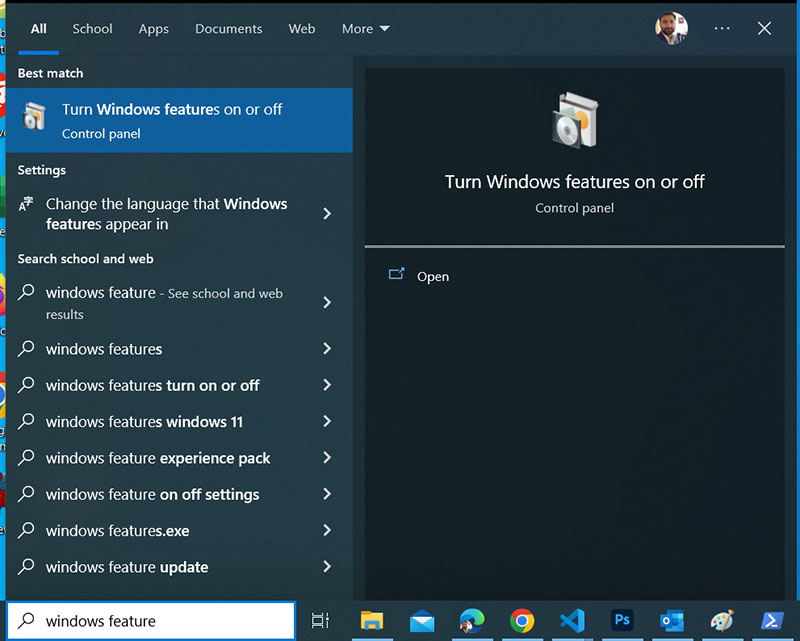
To check whether WSL windows feature is turned on, you can go through the following process given in screenshots.
1. Search on Windows Taskbar for Turn on Windows Feature On or Off and then Select

Turn WSL Windows Feature On
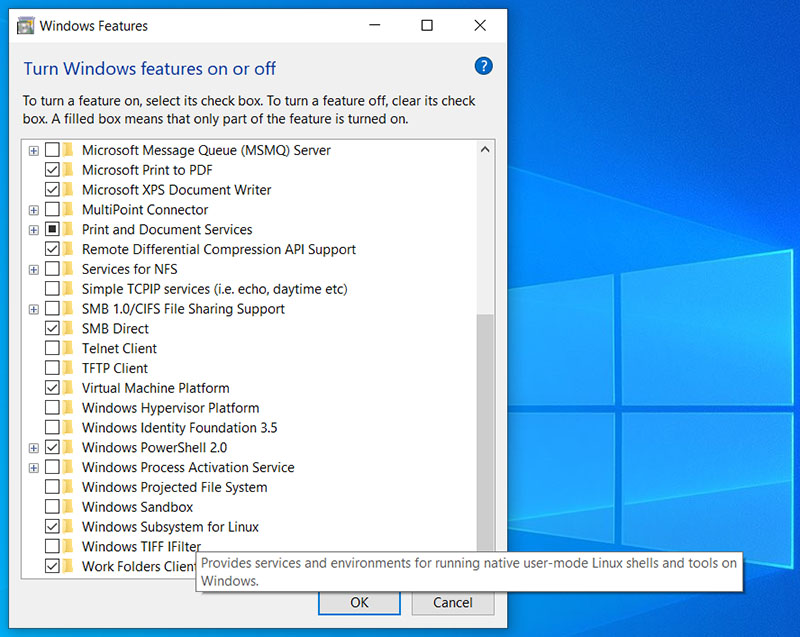
2. It is recommended to select Windows Subsystem for Linux checkbox as marked in the screenshot below and click ok.

Windows Subsystem for Linux to be checked as shown in the screenshot
Step 2: Install Ubuntu from Microsoft Store
Once WSL is enabled, open the Microsoft Store and search for "Ubuntu." Select the Ubuntu distribution you prefer (e.g., Ubuntu 20.04 LTS or Ubuntu 22.04) and click on the "Install" button. The installation process will begin, and the Ubuntu distribution will be downloaded and set up.
Step 3: Launch Ubuntu and Create a User Account

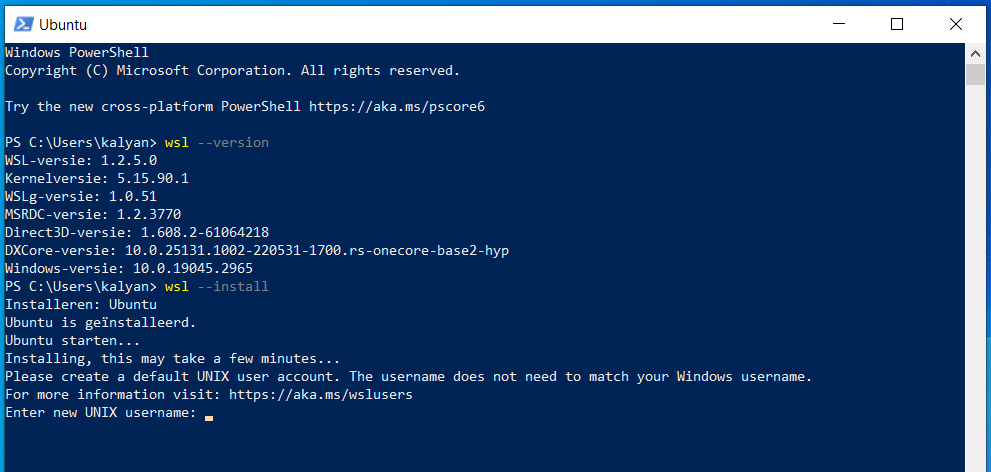
Install ubuntu and create a user account: adding username and password
After the installation is complete, you can launch Ubuntu from the Start menu or by searching for "Ubuntu" in the search bar. The first time you launch Ubuntu, it will take some time to complete the initialization process. Once it's ready, you will be prompted to create a new username and password for your Ubuntu account. Follow the on-screen instructions to set up your user account.
Step 4: Update and Upgrade Ubuntu
After creating your user account, it is recommended to update the Ubuntu distribution to ensure you have the latest packages and security updates. Open the Ubuntu terminal and run the following commands:
sudo apt update
sudo apt upgrade
Enter your password when prompted, and wait for the updates to finish installing.
Step 5: Optional: Customize WSL Settings
WSL provides various configuration options to enhance your experience. You can modify settings such as default WSL version, resource allocation, and integration with Windows. To access these options, open PowerShell as an administrator and run the following command:
wsl --set-default-version
Replace
To set the default version of WSL to WSL 2, you can use the following command:
wsl --set-default-version 2
This command will set WSL 2 as the default version for any new Linux distributions you install. Existing distributions will not be automatically upgraded to WSL 2 by running this command.
To specify the WSL version for a specific Linux distribution, you can use the wsl --set-version command followed by the distribution name. For example, to set Ubuntu 22.04 to use WSL 2, you would run:
wsl --set-version Ubuntu-22.04 2
Make sure you have already installed and set up the Ubuntu 22.04 distribution before running this command.
Remember to replace "Ubuntu-22.04" with the actual name of your Ubuntu distribution as shown in the output of the wsl --list command.
wsl --list
wsl -l -v
Step 6: Start Using Ubuntu on Windows
Congratulations! You have successfully installed Ubuntu on your Windows machine using WSL. You can now start using Ubuntu by launching the Ubuntu terminal from the Start menu or by searching for "Ubuntu." You have access to a full-fledged Ubuntu environment with access to the command-line interface and all the tools and packages available in Ubuntu.
To check the latest version of Ubuntu, you can visit the official Ubuntu website or use the terminal command. Here's how you can do it using the terminal:
Open a terminal on your Ubuntu system and execute the following command:
lsb_release -a
This command will provide you specific information about your Ubuntu version, such as the release number and code name. The "Description" column will display the version you are presently using.
You may also check the Ubuntu website for the most recent version. Navigate to the "Download" part of the official Ubuntu website at https://ubuntu.com/. The most recent version of Ubuntu will be prominently highlighted.
Finally, by following these instructions, you can set up Ubuntu on your Windows PC via WSL. This enables you to experience the advantages of both Windows and Ubuntu while using the power and flexibility of Linux within your Windows environment. Exploration of the large Linux ecosystem, executing command-line utilities, and development of Linux-based programs may all be done from within your Windows operating system.
Please keep in mind that the methods in this blog may differ somewhat based on the version of Windows you are using. If you need special instructions for your Windows version, consult the official Microsoft manual.